Search The Homestead

Thursday, January 27, 2011

Week Four - Recycled Sweater Mittens

This week's project was funded and inspired by my sister (thanks, Mellie!).  By funded, I mean she discovered holes in her nice, cashmere sweater while we were visiting, and made me take it.  By inspired, I mean she mentioned words like "Martha Stewart" and "mittens" and "crafty" as she forced the sweater into my hands.  The brute.


So under that considerable pressure, I looked up the actual Martha Stewart pattern  for recycled sweater mittens (Doesn't Molly Ringwald look scared?  Sheesh!), and a few others, and got to work.  I decided to try a bit from one pattern and a bit from another pattern.  Since I had an entire sweater's worth of cashmere to work with, I also decided to try out two different techniques, cutting straight from the cloth, and felting.  I have never felted, successfully, before.  Should be a cinch, right?

First Set of Mittens:

The first almost-pattern suggested using the sleeves for mittens, since they are already mostly sewn, and have a nice cuff built in.  The pattern just suggested edging out a thumb from the sleeve.  Minimal cutting, minimal sewing. 


This sounded great, but my sis is a good bit trimmer than I am, so the sleeves on her sweater are very narrow.


I decided to graft on a thumb.  The cutting was easy, but the grafting was difficult.  I had to invent a way to sew something onto a tube without closing the tube.  It took some time, but I figured it out.


I also had to work with my new sewing machine to find a stitch that wouldn't pull through the soft cashmere.  Thank goodness I read the manual!  The tension looked a little bit wrong, but it didn't pull through, and it didn't snarl.  Bonus!

The first mitten (the right one in the photo below) came out pretty great.  I hadn't anticipated the seam around the thumb.  (I'm an amateur.)  However, I actually like the look.  A little rustic edging.


The second mitten (the left one, above), however...ugh.  Look at that thumb!  Apparently I went a bit off when I sewed around the top.  And apparently there was a seam on that piece of fabric that also affected the shape. 

They are crazy soft, though!  And they fit like, well, a glove.  Without fingers.  Forgive me.

Second Pair of Mittens (Martha-esque Mittens):

I made this second set of mittens from the body of the sweater.  But first I also tried my hand at felting, since Martha recommended that in a different sweater-mitten pattern.  Holy Fluffiness, Batman!  In hindsight, I am not actually sure you can felt cashmere.  Perhaps all the warnings about washing it aren't so much because of shrinkage, as because of imminent fluff.  But I pressed on.


After the mistakes of the first pair, I simply cut along a pattern I made of my hand.  They should have turned out much more similar than the first pair (hello, thumbs!)


Much as I hate to admit it, Martha Stewart does know her crafts.  These sewed up easily and the two mittens actually looked the same.  Even after my inept sewing.


I definitely like the Martha Stewart ones better, even if the cashmere didn't truly felt.  They are consistent, comfortable, and very easy to make.  I am already thinking of other ways I can raid my closet for wool sweaters so I can make more mittens.

Lessons Learned:
  1. Thumbs require precision; if one is not careful they can become shockingly, hilariously funky.
  2. Cashmere doesn't felt so much as disintegrate into soft pieces of fuzz that stick to the inside of the washing machine (and everything else).  Running it through the dryer does not make that scenario better!  Just much, much fluffier!
  3. Patterns might possibly exist for a reason.
  4. You can make a lot of mittens out of one sweater!
Overall, I give this project...


Thumbs UP!

Thursday, January 20, 2011

Week Three - Mug Hugger

Week Three Project - Mug Hugger

I ran into an interesting problem in this the 3rd week of my 52 Projects.  I have too many projects to choose from and no distinct order to get them accomplished.  Because of this strange problem, I found myself dithering.  Until suddenly I realized that if I didn't choose, I would fall behind!  And it is way too early to fall behind.


So I chose a quick project at random and ended up with a Mug Hugger.  This silly little project was inspired by one in A Knitter's Year, but I did it my way.  (More on that in a moment.)  It is purportedly to insulate a mug in order to keep your drink warmer longer, but I think mine would work better turning an ugly mug into a fancy pen holder.


Essentially, I knit a short scarf and then bound the edges of the short ends together, leaving a hole for the mug handle.  My mug hugger turned out too wide for most of our mugs, so that it would be difficult to drink from it.  At the same time, I think it was slightly too short, so it is a tight squeeze to get the thing fitted over the handles.


However, I made it out of cotton, which I haven't worked with before, so that was a nice change.  Not only is the cotton all natural, but it is machine washable.  It seemed important since I am notoriously clumsy and the hugger would definitely get dirty.

Book Review: A Knitter's Year

The Knitter's Year: 52 Make-in-a-Week Projects-Quick Gifts and Seasonal Knits As I mentioned when I first listed my New Years Resolutions, I had planned to use A Knitter's Year as a guide for my 52 Projects in 52 Weeks.  The book, of course, is designed with just that idea in mind.  It contains 52 fairly simplistic projects categorized by season.    However, I am now certain that I will not be using this book for all of my projects, and not just because I want to sew.

The Pros:

A Knitter's Year has a lot going for it.  Not only is it an inspiring idea (clearly), but the projects are not too daunting.  The pictures are wonderful and give a clear idea of what the project should look like, although some allowance must be made for scale.  (Hello, Egg Cups , you look as big as hats.)

Debbie Bliss is a big name among some knitters, though admittedly not this one.   So I know just having a book by her is a thrill for some.  I assume that since she is so well known, she can be forgiven for exclusively using her own brand of yarn, too.  That's just good marketing, baby.

A lot of the projects are quirky, fun little ideas that may inspire a knitter to pick up her sticks.

The Cons:

Unfortunately, this book has some serious drawbacks, if you are a knitter.  For one, while there are a multitude of varied projects in the book, more than once I found myself thinking, really, another hat, scarf, or baby bootie?  No joke, there are two different patterns for baby hats, and four for booties.

And speaking of hats.  I seriously question why every round project (hats, socks, booties, tea cozy, gloves, etc.) is knit on two needles.  I knit a lot of hats and socks (a lot!) and I so much prefer knitting on double-points.  You get a better sense for the end product, and no seams.  Clearly this is the author's preference, but I know I will have to adjust these patterns before I devote the time.

Scale is another issue.  If one only knits one project a week, then why are all these projects on such a small scale?  Fully half of the projects in the book are for children or babies.  The scale of the projects makes me wonder if they are just afterthoughts for your week.  Some projects could be completed in a day (like today's Mug Hugger.)

Finally, for all that this is supposedly a good book for beginners, this is not a teaching book.  I, for one, need to learn to make cables before I can tackle half of the patterns.  And that is frustrating.

All in all, I am glad I have the book, but I am also glad I did not commit to faithfully following its every pattern.  I will be amending them as I see fit, and looking elsewhere for patterns that fit my whims.

Pruning in January

It seems that one must do work in an orchard in January.  I never would have known this if it weren't for a gift I received from some very good friends.  According to The Backyard Orchardist (my new bible for all things fruit-tree-ish), you must prune dormant apple and pear trees in January.  It does reduce the amount of fruit your trees would have borne, but the trees will be healthier in the long run.

So today being a mild January day, I headed over to the orchard with my loppers.  ["Over to the orchard" is fancy talk for "around the side of the house", by the way.]   The homestead already had two established pear, and two established apple trees when we moved in.  As far as I can figure, the trees are about 3 years old.  That they have been virtually abandoned for those 3 years is painfully obvious.
Moonglow Pear
Keifer Pear
You can see how close together the branches are.  The trees have been growing well, and with the exception of one apple tree, all are tall and healthy.  (The one apple is crooked
 and stunted.  I like it, but I worry it is going to keel over.)

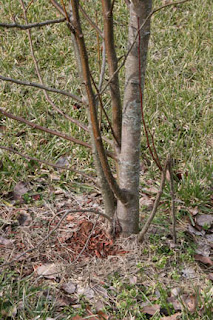
As you can see from the close-ups, the bases of the trees are full of little, feeder branches and shoots.  These actually take energy away from the upward growth of the tree and will limit the fruit production.  So they had to go.  

I was pretty sparing with my loppers.  In truth, I really don't like hurting trees, and am a live-and-let-grow type of girl.  But I want these trees to do well, and branches in the wrong places can rub against each other and invite fungus and rot.  And, honestly, who wants that?

My problem with the loppers, wonderful tool that they are, is that ours are old and dull.  So I am still a bit worried about rot and fungus from so mis-pruned areas.  Trees are so delicate!

Anyway, the four, older fruit trees are now pruned.  And I took off a feeder or two from one of the new plums.  So precocious!

I feel like I am starting our year off right.  Taking care of the homestead should be a year-round task, not just a few months of frenetic activity.  And I am grateful for The Backyard Orchardist, and for the friends who gave it to me when I moved away. 


Thursday, January 13, 2011

Cheesemaker!

I did it!  I have accomplished cheese!

Each cheese ball is the size of a baseball!


I didn't have anyone to hold the camera, so no pictures of the stretching process.  But I can tell you that the cheese was almost too hot for my wimpy hands to handle.  And it looked just as crumbly and un-curdlike as last time.  I was about to despair, when the first glimmer of stretchiness arrived.  Then the curd was suddenly elastic and taffy-like.  And voila!  Cheese.

Whew!  Sometimes I amaze myself.

Wednesday, January 12, 2011

Week Two - Curtains

It is the second week of 2011, and I am right on track on my 52 Projects in 52 Weeks resolution.  This is probably my most favorite New Year's Resolution ever, hands down.  I made the standard lose weight, go to the gym-type resolutions, too, but I love the new projects.  I feel like I have a definitive creative outlet, and a firm timeline to keep me on track.

Anyway, on to the project.  Well, some back story, first.  When we were trying to sell our house in Indiana, our Realtor suggested that I purchase some fabric to make a quick swag for the windows in our bedroom.  I did, and it looked good (and the house got an offer), but I always wanted to do more with the fabric, once we moved.  So I carefully packed the fabric and made sure that it got loaded on the truck.  Or so I thought.

Flash forward six months and I had completely given up hope on finding the fabric.  Every box has been unloaded, and I had ransacked the house at least three times looking for it.  As sometimes happens, it seemed that the minute I had truly given up, I found the fabric tucked away in a bag, in a closet.  I was so excited that I screeched and danced around.  And I instantly knew what my project would be this week.  I would make curtains!


I am not a great seamstress, and I have never tackled a project like this before.  However, my Mother-in-Law gave me a fabulous new sewing machine for Christmas and I felt confident that I could do a good job, if I was really careful.

First I read every instruction for the sewing machine - and I faced up to the fact that I was probably the problem with my old machine.  Not the machine.

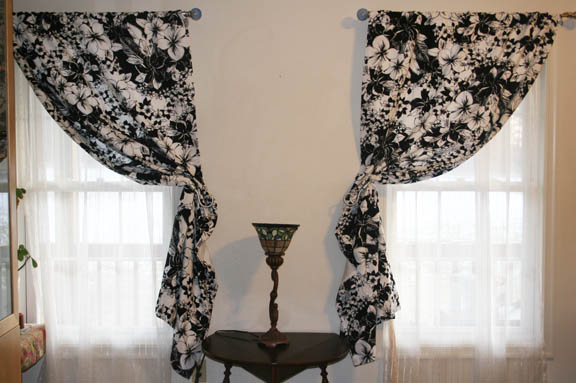
Then I found a pattern on a great website called Sew 4 Home (thanks Michele!), and they were comprehensive and easy to follow.  I was able to line the curtains and create the rod pocket, all with a minimum of headache.  All in about 6 hours of frequently interrupted work, spread over two days.  Yay!

My only complaint about the project was unavoidable.  I just don't have a workspace large enough for a project this big.  I made due at the kitchen table, but my measuring apparently suffered from the lack of space.  (One curtain is 1.5 inches shorter than the other.  Shhh.  Don't tell.)

Overall, I am so very happy.  The curtains are lined, pressed, and as perfect as I could make them.  And I finally have my fabric exactly where I want it: where I can see it.

Thursday, January 6, 2011

Catalog Mania

I think it is probably a good thing that I do not have an unlimited, disposable income, because we would run out of land before I ran out of plants!

Actually, that may happen, anyway.

I received my first seed catalog last week (thank you Seed Savers Exchange).  I finally understand what all new homesteaders talk about!  I want it ALL!  I went through the catalog cover to cover, highlighting seeds that looked interesting, necessary, delicious, or just plain fun.  When I looked at what I had highlighted, I was amazed!   I had marked out at least 50 varieties of vegetable! 

My husband was worried. We had terrible luck with our fall garden.  Our soil is clay so compact that water doesn't drain.  Do we really want to go hog wild our first summer here and chance an utter failure?

In a word, yes!  I am ordering everything I highlighted, budget willing, and damn the consequences.  I am jumping straight in.

But that isn't the only one!  Yesterday, I received an unsolicited nursery catalog and now I am dreaming of even more variety in our orchard.  (Can you call it an orchard if it has a large variety of different fruit trees, not just apples?  Is there a better word?)  Anyway, now I am dreaming of adding persimmon to the orchard, building an arbor for grapes, and planting currants and blueberries.

Doesn't it sound like heaven?  Doesn't it sound delicious?  Doesn't it sound like a crazy amount of work at harvest time?  Yeah, there is definitely that.

Ah, well, give me time.  I am not planning on moving, so I don't have to plant everything now.  I can ease into a larger orchard (or whatever we call it), get used to the harvest that we already have set to go.

But I do love the catalogs.  I love that they come in the dead of winter and bring that spark of spring, that anticipation of sunshine, that hint of deliciousness just around the bend.  A seed or orchard catalog is the perfect beginning to a new year.  A reminder to start planning now, because good things are coming if you do the work!

Tuesday, January 4, 2011

Week One - Wrist Warmers

Week one in my 52 Weeks of Projects is here and I am right on schedule!  (Hooray!)

Since the book I was going to use as a guide has not arrived yet, I designed and knitted something I have been wanting for a while:


Wrist warmers!

I am always cold.  ALWAYS.  And since I cannot afford to run the heat until it brings the house up to 75', and since our heat pump couldn't handle that anyway, I need to warm myself without making my family crazy.

So I made wrist warmers.  This project was great because I finally learned how to make a thumb hole (and did a dandy job first time out of the box - yay me!), so now I can make more of these, and also transition right into mittens.  

This project also allowed me to use some yarn I had been saving for years, waiting for the right project.  I love how the wool transitions from gray to purple to green.  Very Jen.  My only complaint is that the patterns on the two wrist warmers did not match up.  I thought I was doing great when both the cuffs were gray, but then the manufacturers did a switcharoo and tied a green string to a purple and completely messed me up.  I could have pulled it out, but I didn't want to waste yarn.  Well, live and learn.

So now I can have warm, stylish hands, but usable fingers.

(This picture and the first one were taken by the almost-5-year-old.  He's pretty good!)