I decided to make my own pattern for a sea turtle and I am so proud! And I am counting it as a weekly project since I had to do math to figure out the pattern. Math is hard!
Do you like it? Do you want to see more pictures? Do you want one? (Cue shameless self-promotion...) This one is up for sale on my etsy site! More to follow!
Search The Homestead
Showing posts with label sewing. Show all posts
Tuesday, June 14, 2011
Sunday, June 5, 2011
Project 19 - Turtles!
Finally, a new project! I have been majorly distracted by the new job, and the broken well, and packing for the beach, and a huge review book I received (more on that when the confidentiality agreement lets me talk about it.). But I finally found time to make another project. I am a little behind, but I have plans to help me catch up.
This week's project was a snap decision when I found a tutorial on a blog I follow. Funny how a turtle, notoriously slow creature that it is, can be a fast project!
And it was so fun and simple that I just had to make two.
Everyone needs a buddy, right?
This is the perfect project to use up scraps. And if you cut all the pieces at once, like I did, you can make a bunch of them in a short amount of time. They would make great baby gifts. In fact, I may make a few more to have on hand for quick presents.
I gave these two to my sons, of course. They think the coolness of turtles outweighs all the pink.
Tuesday, May 10, 2011
Project 17 - Arrow Quiver
This week my kids had a special request - they wanted arrow quivers to go with their new bow and arrow sets. The bows are made of PVC and the arrows have suction cups on the end. Since the quivers sold at the fair cost as much as the bow and arrow sets, a homemade quiver seemed perfect. And since the 7-year-old even said it could be my weekly project, how could I refuse? (I love the family encouragement!)
I made a basic bag design with a diagonal strap.
The strap is reinforced to hold up to the rigors of marauding through the wilds of Virginia.
The sizing seems perfect, but the bags tend to slide once the kids get moving. The kiddos helped me with a redesign, and after some very interesting web searching, I added another cross strap for the other shoulder (not pictured.) Problem solved.
The kids are excited and I am proud of my quick, home-designed arrow quivers. Robin Hood, I will be expecting your call!
I made a basic bag design with a diagonal strap.
Actually, I made two!
The strap is reinforced to hold up to the rigors of marauding through the wilds of Virginia.
The sizing seems perfect, but the bags tend to slide once the kids get moving. The kiddos helped me with a redesign, and after some very interesting web searching, I added another cross strap for the other shoulder (not pictured.) Problem solved.
The kids are excited and I am proud of my quick, home-designed arrow quivers. Robin Hood, I will be expecting your call!
Sunday, May 1, 2011
Project 16 - Nook Keeper
My husband received a Nook for his recent birthday, but it didn't come with a case. So I thought I would come to the rescue and sew one fore him. Clearly, I was overconfident after the quilt.
I found a cute pattern on Moda Bake Shop, and amended it to suit his tastes.
Update 5/4/11: I was able to fix it by pulling off the binding and sewing it on again in the right spot. A good thing, too, since I didn't have enough fabric to do it again! It'll do.
I found a cute pattern on Moda Bake Shop, and amended it to suit his tastes.
It is a really simple design. Basically, it is a padded pocket with a front flap. Very simple. Even I couldn't mess that up. Right?
Unfortunately, I could. And did. Doesn't the Nook look so cute tucked in like that? Too bad it doesn't fit in the pocket!! So frustrating! It is a minuscule amount too wide. A teensy, tiny bit. And I can't fix it!
So, lessons learned:
- I don't know how to sew with batting. Major issues with bunching and thread tension.
- Next time, cut the fabric wider than needed. - clearly I cannot sew a 1/8 seam to save my life.
- Binding is still terribly difficult!
Update 5/4/11: I was able to fix it by pulling off the binding and sewing it on again in the right spot. A good thing, too, since I didn't have enough fabric to do it again! It'll do.
Friday, April 29, 2011
Quilt - Update
And here is my new quilted table centerpiece, in action:
It took me an hour to unearth my kitchen table, so this is a major accomplishment around here. Meals in the kitchen, once again. The kids are going to be so mad!
(I also added one more picture to the original post. Somehow that one didn't save the first time around.
It took me an hour to unearth my kitchen table, so this is a major accomplishment around here. Meals in the kitchen, once again. The kids are going to be so mad!
(I also added one more picture to the original post. Somehow that one didn't save the first time around.
Thursday, April 28, 2011
Project 15 - Woven Quilt
I am very proud of this week's project (well, really it spanned 2 weeks.) I finally bit the bullet and made my first attempt at quilting!
I followed a very simple pattern, using 1 jelly roll (apparently fabric can be sold in special cuttings that all sound like food!) I just wove the strips in and out and then sewed up the seams. It is all machine-quilted - I didn't want to do the handwork.
Unfortunately, that shows at the binding, where the front and back did not line up. Embarrassing, but I am not about to pull it all out. Live and learn
Just the same, I had fun and I love it. Now, the original pattern was for a rug, but I cannot imaging putting that much effort into something and letting it get muddy. My quilt is not padded and is heavy. I think it would work will in the middle of our kitchen table, so that is where it is going to live. Bunnies and all.
I followed a very simple pattern, using 1 jelly roll (apparently fabric can be sold in special cuttings that all sound like food!) I just wove the strips in and out and then sewed up the seams. It is all machine-quilted - I didn't want to do the handwork.
Unfortunately, that shows at the binding, where the front and back did not line up. Embarrassing, but I am not about to pull it all out. Live and learn
Just the same, I had fun and I love it. Now, the original pattern was for a rug, but I cannot imaging putting that much effort into something and letting it get muddy. My quilt is not padded and is heavy. I think it would work will in the middle of our kitchen table, so that is where it is going to live. Bunnies and all.
Monday, April 18, 2011
Project 14 - Document Case
This week's project was born of necessity. I am going back to work (long story for another post), and so we needed to buy a second car. Which we did. On Friday. Come Friday night I realized I need something to keep the registration, etc., safe and handy in the glove box. (I know I could just use an envelope, but they get damaged and lost easily. And what fun are they?)
So I decided to sew one. Well, two. We have two cars, why not make two document keepers.
I found some scrap plaid fabric and linen to line it in my stash, and used some buttons I have had forever (I love buttons!) So this project was completely free.
I love that I could make up a pattern and it looks almost like it did in my head. I also love that I finally got to use my button whole maker and it worked perfectly! Love, love, love this sewing machine!
If I had to do this one again, I would add some batting to make it more sturdy. Overall, though, I count this a success.
I will post pictures when I can get the computer to talk to the camera. Right now, they are apparently feuding. Update 4/22/11, pictures finally posted.
So I decided to sew one. Well, two. We have two cars, why not make two document keepers.
I found some scrap plaid fabric and linen to line it in my stash, and used some buttons I have had forever (I love buttons!) So this project was completely free.
I love that I could make up a pattern and it looks almost like it did in my head. I also love that I finally got to use my button whole maker and it worked perfectly! Love, love, love this sewing machine!
If I had to do this one again, I would add some batting to make it more sturdy. Overall, though, I count this a success.
I will post pictures when I can get the computer to talk to the camera. Right now, they are apparently feuding. Update 4/22/11, pictures finally posted.
Monday, April 11, 2011
Project 13 - Two-Handed Oven Mitt
I am so excited! This is the project I have been wanting to make for weeks. But it seemed every time I sat down to sew I either had the wrong fabric, too little fabric, no time, or just plain didn't understand the pattern. Well last night everything clicked and I can finally present....
I have always wanted one of these, so when I saw the pattern on sew4home, I knew I had to make it. And I am so happy with the way it turned out. It is pretty, it is functional, and it was fairly easy to put together (once I understood the pattern).
![]() |
| My Two-Handed Oven Mitt |
I love it.
Sunday, March 27, 2011
Week 12 - Project 11 - Grocery Tote
We had company this weekend and had a great time. However, I didn't let that distract me. I finally managed to get my weekly project done. This week I continued my using-plastic-grocery-bags-is-bad-for-ME kick. So to go along with my produce bags (week 10), I made grocery totes out of some curtains my mother gave me.
I liked this project (found on the Wisdom of the Moon blog), but I am not sure I love it. Yet. It certainly sewed up fast. I cut three bags in 5 minutes, and sewed one in 20 minutes. Honestly, making the handles and trimming the thread took the most time! I can probably get 8 more bags out of one curtain, which is fairly awesome. And these are self-lined, since the curtains also had lining. And I have 3 more curtains (all gold)!
I just need to see how they do with real groceries. Real ones, not these plastic ones the kids lent me.
Project 12 coming soon...
Yes, that is gold lamme!
I liked this project (found on the Wisdom of the Moon blog), but I am not sure I love it. Yet. It certainly sewed up fast. I cut three bags in 5 minutes, and sewed one in 20 minutes. Honestly, making the handles and trimming the thread took the most time! I can probably get 8 more bags out of one curtain, which is fairly awesome. And these are self-lined, since the curtains also had lining. And I have 3 more curtains (all gold)!
I just need to see how they do with real groceries. Real ones, not these plastic ones the kids lent me.
Project 12 coming soon...
Sunday, March 13, 2011
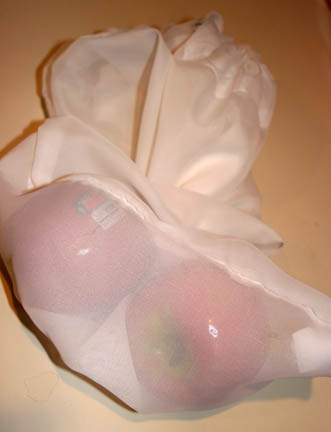
Week Ten- Produce Bags
This week's project requires some back story. I do all the grocery shopping in my family and each week I find myself disgusted with the amount of plastic that comes home with me. Before the move, I always used reusable cloth bags for my shopping. Our local grocery store clerks in our new town are not supportive of that, but to hell with them. Next week the bags are coming back out.
That said, I never solved the problem of all the plastic produce bags I need for all our fruits and veggies! I tried bringing them back every week and using them until they ripped or got nasty, but that tended to be hit or miss. So lately I have been looking at reusable bag options for produce. I have seen net bags, knit bags, and vinyl bags, but recently I found the solution I love. Sheer bags made from curtains.
I love this project! It cost me exactly nothing and is the essence of reusing materials on hand. The sheer curtains were given to me by my mother, and one curtain made NINE bags! It was also an amazingly quick project. Nine bags, an hour and half of work! Wowza!
Next week's project is related to this one. So if you liked this, stay tuned. If not, bear with me. The quirky, less practical projects are coming.
That said, I never solved the problem of all the plastic produce bags I need for all our fruits and veggies! I tried bringing them back every week and using them until they ripped or got nasty, but that tended to be hit or miss. So lately I have been looking at reusable bag options for produce. I have seen net bags, knit bags, and vinyl bags, but recently I found the solution I love. Sheer bags made from curtains.
I love this project! It cost me exactly nothing and is the essence of reusing materials on hand. The sheer curtains were given to me by my mother, and one curtain made NINE bags! It was also an amazingly quick project. Nine bags, an hour and half of work! Wowza!
Next week's project is related to this one. So if you liked this, stay tuned. If not, bear with me. The quirky, less practical projects are coming.
Sunday, March 6, 2011
Week Nine - Purse
I am so in love with this week's project!
The design comes from Sew4Home, though it is slightly adapted to my needs. (I didn't have enough fill to make it sturdy to the top, but I like the floppiness of my edge.)
This is a nice, narrow bag, with a cute, punky feel.
It has two, cute pockets inside. And the pink is deep and saturated. Just the way I like it.
I like the look of this project, and the usefulness. I also learned a few new techniques, and got to know my sewing machine better. We are developing a nice relationship.
And I definitely could not have done this project without the cutting mat you see behind the bag. My mother-in-law sent it to me as a surprise, and it has been amazingly helpful. Thanks, Kathy!
Sunday, February 27, 2011
Week Eight - Bag Dispenser
I gave up on the planned project for this week when I realized that I didn't read the instructions well and bought the wrong amount of fabric. Typical. I will keep the idea in reserve, for now.
Anyway, I took that fabric from the non-project turned it into something useful.
I love it. I always save my plastic bags and reuse them as much as possible, but I get really tired of the plastic bag tumbleweeds rolling across my kitchen. Now I have this simple solution. And it is huge, so it should take a while to fill up. (I didn't mean for it to be so huge, but it is.)
Anyway, I took that fabric from the non-project turned it into something useful.
A Bag Dispenser!
I love it. I always save my plastic bags and reuse them as much as possible, but I get really tired of the plastic bag tumbleweeds rolling across my kitchen. Now I have this simple solution. And it is huge, so it should take a while to fill up. (I didn't mean for it to be so huge, but it is.)
Thursday, January 27, 2011
Week Four - Recycled Sweater Mittens
This week's project was funded and inspired by my sister (thanks, Mellie!). By funded, I mean she discovered holes in her nice, cashmere sweater while we were visiting, and made me take it. By inspired, I mean she mentioned words like "Martha Stewart" and "mittens" and "crafty" as she forced the sweater into my hands. The brute.
So under that considerable pressure, I looked up the actual Martha Stewart pattern for recycled sweater mittens (Doesn't Molly Ringwald look scared? Sheesh!), and a few others, and got to work. I decided to try a bit from one pattern and a bit from another pattern. Since I had an entire sweater's worth of cashmere to work with, I also decided to try out two different techniques, cutting straight from the cloth, and felting. I have never felted, successfully, before. Should be a cinch, right?
First Set of Mittens:
The first almost-pattern suggested using the sleeves for mittens, since they are already mostly sewn, and have a nice cuff built in. The pattern just suggested edging out a thumb from the sleeve. Minimal cutting, minimal sewing.
This sounded great, but my sis is a good bit trimmer than I am, so the sleeves on her sweater are very narrow.
I decided to graft on a thumb. The cutting was easy, but the grafting was difficult. I had to invent a way to sew something onto a tube without closing the tube. It took some time, but I figured it out.
I also had to work with my new sewing machine to find a stitch that wouldn't pull through the soft cashmere. Thank goodness I read the manual! The tension looked a little bit wrong, but it didn't pull through, and it didn't snarl. Bonus!
The first mitten (the right one in the photo below) came out pretty great. I hadn't anticipated the seam around the thumb. (I'm an amateur.) However, I actually like the look. A little rustic edging.
The second mitten (the left one, above), however...ugh. Look at that thumb! Apparently I went a bit off when I sewed around the top. And apparently there was a seam on that piece of fabric that also affected the shape.
They are crazy soft, though! And they fit like, well, a glove. Without fingers. Forgive me.
Second Pair of Mittens (Martha-esque Mittens):
I made this second set of mittens from the body of the sweater. But first I also tried my hand at felting, since Martha recommended that in a different sweater-mitten pattern. Holy Fluffiness, Batman! In hindsight, I am not actually sure you can felt cashmere. Perhaps all the warnings about washing it aren't so much because of shrinkage, as because of imminent fluff. But I pressed on.
After the mistakes of the first pair, I simply cut along a pattern I made of my hand. They should have turned out much more similar than the first pair (hello, thumbs!)
Much as I hate to admit it, Martha Stewart does know her crafts. These sewed up easily and the two mittens actually looked the same. Even after my inept sewing.
I definitely like the Martha Stewart ones better, even if the cashmere didn't truly felt. They are consistent, comfortable, and very easy to make. I am already thinking of other ways I can raid my closet for wool sweaters so I can make more mittens.
Lessons Learned:
So under that considerable pressure, I looked up the actual Martha Stewart pattern for recycled sweater mittens (Doesn't Molly Ringwald look scared? Sheesh!), and a few others, and got to work. I decided to try a bit from one pattern and a bit from another pattern. Since I had an entire sweater's worth of cashmere to work with, I also decided to try out two different techniques, cutting straight from the cloth, and felting. I have never felted, successfully, before. Should be a cinch, right?
First Set of Mittens:
The first almost-pattern suggested using the sleeves for mittens, since they are already mostly sewn, and have a nice cuff built in. The pattern just suggested edging out a thumb from the sleeve. Minimal cutting, minimal sewing.
This sounded great, but my sis is a good bit trimmer than I am, so the sleeves on her sweater are very narrow.
I decided to graft on a thumb. The cutting was easy, but the grafting was difficult. I had to invent a way to sew something onto a tube without closing the tube. It took some time, but I figured it out.
I also had to work with my new sewing machine to find a stitch that wouldn't pull through the soft cashmere. Thank goodness I read the manual! The tension looked a little bit wrong, but it didn't pull through, and it didn't snarl. Bonus!
The first mitten (the right one in the photo below) came out pretty great. I hadn't anticipated the seam around the thumb. (I'm an amateur.) However, I actually like the look. A little rustic edging.
The second mitten (the left one, above), however...ugh. Look at that thumb! Apparently I went a bit off when I sewed around the top. And apparently there was a seam on that piece of fabric that also affected the shape.
They are crazy soft, though! And they fit like, well, a glove. Without fingers. Forgive me.
Second Pair of Mittens (Martha-esque Mittens):
I made this second set of mittens from the body of the sweater. But first I also tried my hand at felting, since Martha recommended that in a different sweater-mitten pattern. Holy Fluffiness, Batman! In hindsight, I am not actually sure you can felt cashmere. Perhaps all the warnings about washing it aren't so much because of shrinkage, as because of imminent fluff. But I pressed on.
After the mistakes of the first pair, I simply cut along a pattern I made of my hand. They should have turned out much more similar than the first pair (hello, thumbs!)
Much as I hate to admit it, Martha Stewart does know her crafts. These sewed up easily and the two mittens actually looked the same. Even after my inept sewing.
I definitely like the Martha Stewart ones better, even if the cashmere didn't truly felt. They are consistent, comfortable, and very easy to make. I am already thinking of other ways I can raid my closet for wool sweaters so I can make more mittens.
Lessons Learned:
- Thumbs require precision; if one is not careful they can become shockingly, hilariously funky.
- Cashmere doesn't felt so much as disintegrate into soft pieces of fuzz that stick to the inside of the washing machine (and everything else). Running it through the dryer does not make that scenario better! Just much, much fluffier!
- Patterns might possibly exist for a reason.
- You can make a lot of mittens out of one sweater!
Thumbs UP!
Wednesday, January 12, 2011
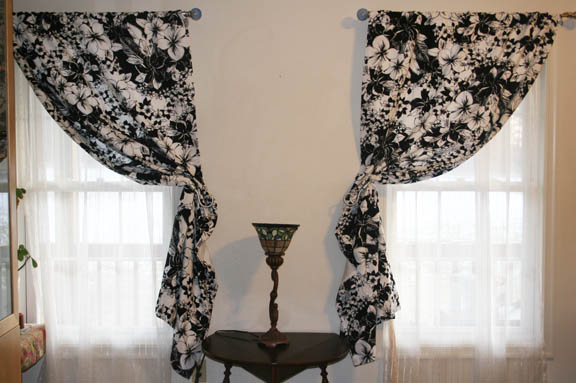
Week Two - Curtains
It is the second week of 2011, and I am right on track on my 52 Projects in 52 Weeks resolution. This is probably my most favorite New Year's Resolution ever, hands down. I made the standard lose weight, go to the gym-type resolutions, too, but I love the new projects. I feel like I have a definitive creative outlet, and a firm timeline to keep me on track.
Anyway, on to the project. Well, some back story, first. When we were trying to sell our house in Indiana, our Realtor suggested that I purchase some fabric to make a quick swag for the windows in our bedroom. I did, and it looked good (and the house got an offer), but I always wanted to do more with the fabric, once we moved. So I carefully packed the fabric and made sure that it got loaded on the truck. Or so I thought.
Flash forward six months and I had completely given up hope on finding the fabric. Every box has been unloaded, and I had ransacked the house at least three times looking for it. As sometimes happens, it seemed that the minute I had truly given up, I found the fabric tucked away in a bag, in a closet. I was so excited that I screeched and danced around. And I instantly knew what my project would be this week. I would make curtains!
I am not a great seamstress, and I have never tackled a project like this before. However, my Mother-in-Law gave me a fabulous new sewing machine for Christmas and I felt confident that I could do a good job, if I was really careful.
First I read every instruction for the sewing machine - and I faced up to the fact that I was probably the problem with my old machine. Not the machine.
Then I found a pattern on a great website called Sew 4 Home (thanks Michele!), and they were comprehensive and easy to follow. I was able to line the curtains and create the rod pocket, all with a minimum of headache. All in about 6 hours of frequently interrupted work, spread over two days. Yay!
My only complaint about the project was unavoidable. I just don't have a workspace large enough for a project this big. I made due at the kitchen table, but my measuring apparently suffered from the lack of space. (One curtain is 1.5 inches shorter than the other. Shhh. Don't tell.)
Overall, I am so very happy. The curtains are lined, pressed, and as perfect as I could make them. And I finally have my fabric exactly where I want it: where I can see it.
Anyway, on to the project. Well, some back story, first. When we were trying to sell our house in Indiana, our Realtor suggested that I purchase some fabric to make a quick swag for the windows in our bedroom. I did, and it looked good (and the house got an offer), but I always wanted to do more with the fabric, once we moved. So I carefully packed the fabric and made sure that it got loaded on the truck. Or so I thought.
Flash forward six months and I had completely given up hope on finding the fabric. Every box has been unloaded, and I had ransacked the house at least three times looking for it. As sometimes happens, it seemed that the minute I had truly given up, I found the fabric tucked away in a bag, in a closet. I was so excited that I screeched and danced around. And I instantly knew what my project would be this week. I would make curtains!
I am not a great seamstress, and I have never tackled a project like this before. However, my Mother-in-Law gave me a fabulous new sewing machine for Christmas and I felt confident that I could do a good job, if I was really careful.
First I read every instruction for the sewing machine - and I faced up to the fact that I was probably the problem with my old machine. Not the machine.
Then I found a pattern on a great website called Sew 4 Home (thanks Michele!), and they were comprehensive and easy to follow. I was able to line the curtains and create the rod pocket, all with a minimum of headache. All in about 6 hours of frequently interrupted work, spread over two days. Yay!
My only complaint about the project was unavoidable. I just don't have a workspace large enough for a project this big. I made due at the kitchen table, but my measuring apparently suffered from the lack of space. (One curtain is 1.5 inches shorter than the other. Shhh. Don't tell.)
Overall, I am so very happy. The curtains are lined, pressed, and as perfect as I could make them. And I finally have my fabric exactly where I want it: where I can see it.
Tuesday, November 30, 2010
Jen Sews!
(I didn't forget about the blog, I swear. Life has just been a crazy mess lately and there hasn't been anything homesteady to write about.)
My oldest has to have surgery next week. It isn't a major issue, and the problem shouldn't recur, but life on the homestead is definitely shaken up and turned around this month. And since hospital bills are going to be a major blow to our tiny budget, we are tightening our belts. Which somehow lead me to a new project this afternoon.
My son has a very special stuffed dog that he loves and depends on. Doggie is going to the hospital with us next week, and I thought it might make my son feel better if Doggie was also in a hospital gown. However, a certain company that makes clothes for these types of toys is on the pricey side. So, in the spirit of our new lifestyle, I decided to sew it myself!
Caveat: I am not the world's best seamstress.
I started with an old, unused pillowcase and cut out a basic pattern. I even measured Doggie first! I hemmed the edges before joining the pieces.
Then I matched up the edges to be joined.
Then I sewed it all together and added the ribbons to tie it in the back. The ribbons were by far the hardest part. But the finished product looked pretty good!
Until I tried to put it on the dog! Remember when I proudly said that I measured the dog? Well, I guess I didn't allow for the hemming! (Remember my caveat? I tell the truth!)
So the sleeves are a little tight on old Doggie, but it otherwise fits. And it was free!
And look at that happy face! I hope this will make surgery a little easier for my little man.
Afterward:
My idiotic sewing machine decided to break (again) when I tried to make a matching surgical mask. It is something to do with the bobbin tension, I know that much. I just had the machine cleaned and adjusted before we moved, so I think it is at the end of its rope. I know I am at the end of mine, and I don't think using it is good for my blood pressure anymore! Would someone call Santa and request a new one for me? Maybe one of these? ('k thanks)
PPS, I have no clue what is up with the spacing on this post, but I am giving up trying to fix it. Please pardon the huge amounts of white space. I blame my sewing machine.
My oldest has to have surgery next week. It isn't a major issue, and the problem shouldn't recur, but life on the homestead is definitely shaken up and turned around this month. And since hospital bills are going to be a major blow to our tiny budget, we are tightening our belts. Which somehow lead me to a new project this afternoon.
My son has a very special stuffed dog that he loves and depends on. Doggie is going to the hospital with us next week, and I thought it might make my son feel better if Doggie was also in a hospital gown. However, a certain company that makes clothes for these types of toys is on the pricey side. So, in the spirit of our new lifestyle, I decided to sew it myself!
Caveat: I am not the world's best seamstress.
I started with an old, unused pillowcase and cut out a basic pattern. I even measured Doggie first! I hemmed the edges before joining the pieces.
Then I matched up the edges to be joined.
Then I sewed it all together and added the ribbons to tie it in the back. The ribbons were by far the hardest part. But the finished product looked pretty good!
Until I tried to put it on the dog! Remember when I proudly said that I measured the dog? Well, I guess I didn't allow for the hemming! (Remember my caveat? I tell the truth!)
So the sleeves are a little tight on old Doggie, but it otherwise fits. And it was free!
And look at that happy face! I hope this will make surgery a little easier for my little man.
Afterward:
My idiotic sewing machine decided to break (again) when I tried to make a matching surgical mask. It is something to do with the bobbin tension, I know that much. I just had the machine cleaned and adjusted before we moved, so I think it is at the end of its rope. I know I am at the end of mine, and I don't think using it is good for my blood pressure anymore! Would someone call Santa and request a new one for me? Maybe one of these? ('k thanks)
PPS, I have no clue what is up with the spacing on this post, but I am giving up trying to fix it. Please pardon the huge amounts of white space. I blame my sewing machine.
Subscribe to:
Posts (Atom)